How to Run the Django Development Server

Are you looking to start developing web applications with Django but not sure where to begin? One of the first steps in getting started with Django is learning how to run the development server. In this blog post, we will walk you through the process of running the Django development server so you can start building your applications in no time.

Step 1: Install Django
Before you can run the Django development server, you need to have Django installed on your computer. You can easily install Django using pip, the Python package installer. Simply open your command line interface and run the following command:

“`
pip install django
“`

This will download and install Django on your computer, making it ready for you to start building web applications.

Step 2: Create a Django project
Once you have Django installed, the next step is to create a new Django project. Navigate to the directory where you want to create your project and run the following command:

“`
django-admin startproject myproject
“`

This will create a new Django project with the name “myproject” in the current directory.

Step 3: Start the development server
To start the Django development server, navigate to the directory where your Django project is located and run the following command:

“`
python manage.py runserver
“`

This will start the development server on your local machine, allowing you to access your Django application in a web browser. By default, the development server will run on http://127.0.0.1:8000/. You can access your Django application by entering this URL in your web browser.

Step 4: Access your Django application
Once the development server is running, you can access your Django application in a web browser by entering http://127.0.0.1:8000/ in the address bar. You should see the default Django welcome page, indicating that your Django application is up and running.

Congratulations! You have successfully started the Django development server and are now ready to start building web applications with Django. Happy coding!

Understanding the Django Project Structure

If you’re new to web development and looking to learn Django, one of the most popular Python web frameworks, it’s essential to understand the project structure. Django follows a specific structure that helps organize your code and make it easier to manage.

At the core of every Django project is the project directory. This is the main folder that holds all of your project’s files and subdirectories. Inside the project directory, you’ll find the following key components:

1. **Settings**: The settings.py file is where you configure your Django project. This includes database settings, middleware, static files, and more. It’s important to familiarize yourself with this file as it controls many aspects of your project.

2. **URLs**: The urls.py file is where you define the URL patterns for your project. This is where you map URLs to views and control the flow of your application. By defining URL patterns here, you can easily navigate users to different parts of your website.

3. **Views**: Views are the logic behind the web pages in your Django project. They handle user requests and return responses. Views are typically defined in views.py and can be simple functions or class-based views.

4. **Models**: Models represent the structure of your database tables. They define the fields and relationships between different types of data in your application. Models are defined in models.py and are essential for interacting with your database.

5. **Templates**: Templates are used to create the HTML files that are rendered by your views. Templates are stored in a templates directory within your project and allow you to separate your presentation layer from your business logic.

6. **Static files**: Static files such as CSS, JavaScript, and images are stored in a static directory within your project. These files are served directly to users and help style and enhance the user experience of your website.

Understanding the Django project structure is crucial for building successful web applications. By familiarizing yourself with these key components, you’ll be able to navigate and organize your code effectively. Django’s clear and concise project structure makes it easy to develop and maintain complex web applications. Happy coding!

Setting Up Your First Django Project Step-by-Step

Are you ready to dive into the world of web development with Django? Setting up your first Django project may seem daunting at first, but with this step-by-step guide, you’ll be up and running in no time.

Step 1: Install Django

The first step in setting up your Django project is to install Django on your machine. You can do this by running the following command in your terminal:

“`
pip install django
“`

This will install the latest version of Django on your machine and make it available for use in your projects.

Step 2: Create a Django project

Once Django is installed, you can create your first Django project by running the following command in your terminal:

“`
django-admin startproject myproject
“`

This will create a new directory called “myproject” that contains all the necessary files and folders for your Django project.

Step 3: Create a Django app

Next, you’ll need to create a Django app within your project. To do this, navigate to the directory where your project is located and run the following command:

“`
python manage.py startapp myapp
“`

This will create a new directory called “myapp” within your project directory that contains all the files necessary for your Django app.

Step 4: Configure your project settings

The next step is to configure your project settings. Open the settings.py file located in the “myproject” directory and make any necessary changes, such as setting up your database configuration and adding any additional apps you’ve created.

Step 5: Run your Django project

Finally, you can run your Django project by running the following command in your terminal:

“`
python manage.py runserver
“`

This will start a development server that you can access in your web browser by navigating to http://127.0.0.1:8000/.

Congratulations! You’ve successfully set up your first Django project. Now you can start building your web application and exploring all that Django has to offer. Happy coding!

What Is Django? A Beginner’s Introduction

Django is a powerful and popular web framework for building web applications using Python. If you are new to web development and looking to get started with Django, this beginner’s introduction will help you understand what Django is and why it is worth learning.

Django follows the DRY (Don’t Repeat Yourself) principle, which means you can write your code once and reuse it throughout your project. This makes development faster and more efficient. Django also comes with a built-in admin interface, making it easy to manage and update your website without having to write additional code.

One of the key features of Django is its ORM (Object-Relational Mapping) system, which allows you to interact with your database using Python objects. This makes working with databases much easier and more intuitive. Django also includes a powerful templating engine that allows you to create dynamic and interactive web pages.

Another great thing about Django is its extensive documentation and a large community of developers who are always willing to help. Whether you are a beginner or an experienced developer, there are plenty of resources available to help you learn and master Django.

In conclusion, Django is a versatile and user-friendly web framework that is perfect for beginners looking to get started with web development. Its ease of use, powerful features, and strong community make it a great choice for building web applications. So, if you are looking to dive into web development, consider giving Django a try!

AI use cases in Football

AI Use Cases in Football

Artificial Intelligence (AI) has revolutionized various industries, and football is no exception. From enhancing player performance to improving fan engagement, AI technology is reshaping the way the beautiful game is played and experienced. Let’s delve into some fascinating AI use cases in football.

1. Performance Analysis:
AI-powered tools enable coaches and analysts to gain valuable insights into player performance. By analyzing vast amounts of data, such as player positioning, speed, and passing accuracy, AI can help identify patterns and trends that can be used to make informed decisions on tactics and strategy.

2. Injury Prevention:
AI algorithms can predict and prevent injuries by analyzing players’ physical condition and movement patterns. By monitoring factors like fatigue levels and biomechanics, teams can proactively address injury risks and optimize training programs to keep players healthy and fit.

3. Referee Assistance:
AI technology is being used to assist referees in making accurate decisions during matches. Video assistant referee (VAR) systems use AI algorithms to review contentious incidents and provide officials with additional information to make fairer judgments.

4. Fan Engagement:
AI-powered chatbots and personalized content recommendations are enhancing fan engagement by delivering tailored experiences to supporters. From providing real-time match updates to offering interactive experiences, AI is bringing fans closer to the action.

5. Recruitment and Scouting:
AI tools are revolutionizing player recruitment and scouting processes by analyzing player performance data from around the world. By leveraging AI algorithms, clubs can identify talent, assess player potential, and make data-driven decisions when signing new players.

In conclusion, AI is transforming the world of football by improving player performance, enhancing fan experiences, and revolutionizing the way the game is played and managed. As technology continues to advance, we can expect even more innovative AI use cases to emerge in the realm of football.

The future of copywriting in the AI era

In today’s fast-paced digital world, the landscape of copywriting is rapidly evolving with the integration of artificial intelligence (AI) technology. As AI continues to advance, copywriters are faced with the challenge of adapting their skills to meet the changing demands of the industry. So, what does the future hold for copywriting in the AI era?

AI-powered tools are revolutionizing the way copywriters work by streamlining processes and enhancing efficiency. From generating content ideas to optimizing for SEO, AI can assist copywriters in various tasks, allowing them to focus on creativity and strategy. With AI’s ability to analyze data and predict trends, copywriters can create more targeted and personalized content that resonates with their audience.

One of the key advantages of AI in copywriting is its ability to perform in-depth keyword research and optimize content for search engines. By leveraging AI tools, copywriters can identify relevant keywords, analyze competition, and craft compelling content that ranks higher in search results. This not only improves visibility but also drives organic traffic to websites and increases engagement.

However, while AI offers numerous benefits to copywriters, it is essential to strike a balance between automation and human creativity. While AI can assist in generating content, copywriters bring a unique perspective, tone, and style that AI cannot replicate. By combining AI’s analytical capabilities with human ingenuity, copywriters can create compelling and authentic content that connects with audiences on a deeper level.

In conclusion, the future of copywriting in the AI era is bright and full of opportunities. By embracing AI technology and harnessing its power, copywriters can elevate their craft, deliver more impactful content, and stay ahead in an ever-evolving digital landscape. As AI continues to shape the industry, copywriters who adapt and innovate will thrive in this new era of intelligent content creation.

How does generative AI effect SEO

Title: How Does Generative AI Affect SEO?

As we dive deeper into the digital age, technological advancements like generative AI continue to reshape the field of Search Engine Optimization (SEO). With its ability to generate data-driven content, generative AI’s effect on SEO is profound.

Generative AI, a subset of artificial intelligence, uses algorithms and statistical models to produce content. The technology is capable of creating high-quality content that rivals that written by humans. This shift significantly impacts SEO, as content is a critical factor in search engine ranking.

Firstly, generative AI can produce SEO-friendly content at a much faster rate than a human writer. Leveraging AI technology, businesses can efficiently churn out keyword-optimized content that boosts their search engine visibility. This increased productivity can significantly improve a website’s SEO performance.

Secondly, generative AI can help with keyword research, another crucial aspect of SEO. AI’s ability to analyze large data sets can identify trending keywords in a specific industry, helping businesses to optimize their content and stay ahead of the competition.

Additionally, generative AI can enhance content relevance. Search engines like Google prioritize content that provides value to users. Generative AI can analyze user behavior and preferences to create targeted, relevant content, thereby improving the SEO ranking.

However, while generative AI can greatly enhance SEO, it’s essential to remember that it is a tool to assist, not replace, human input. Despite its capabilities, AI lacks the human touch, the ability to connect with readers emotionally, and the capacity to understand cultural nuances. Therefore, a combination of human creativity and AI efficiency is the best approach to SEO.

In conclusion, generative AI has a remarkable impact on SEO. It can improve productivity, assist with keyword research, and enhance content relevance. As we adapt to this exciting technological advancement, the potential for its application in SEO is vast. However, the human element remains crucial to creating content that resonates with audiences.

How to List Files Changed Between Two Commits in Git

When working with Git, there are times when you may want to check which files have been modified between two specific commits. A common scenario is needing to see the files changed between a particular commit with a specific message and the latest commit in your repository.

In this post, I’ll show you how to do this quickly and easily using Git commands. Let’s say you commit with messages like COMMIT_MESSAGE. Now, we want to find out what files have been changed between this commit and the latest commit (referred to as HEAD).

Step 1: Find the Commit Hash

The first step is to locate the commit that has the message COMMIT_MESSAGE. You can find this commit by using the following command:

git log –grep=”COMMIT_MESSAGE

This command will display a list of commits that have messages matching COMMIT_MESSAGE. Once you see the correct commit, take note of its hash (a long string of letters and numbers).

Step 2: List the Files Changed Between the Two Commits

After finding the commit hash, you can now list the files changed between that commit and the latest commit (HEAD) by using the following command:

git diff –name-only HASH HEAD

Replace HASH with the actual commit hash you found in the previous step. This command will list the files that have changed between the specified commit and the latest commit.

Explanation of Commands

  • git log --grep="message": This command searches through the commit history for commits that contain the given string in their commit message. The --grep option allows you to filter commits based on their message content.
  • git diff --name-only: This command compares two commits and shows the files that have been changed between them. The --name-only option limits the output to just the file names, without showing the details of the changes. If you want to see the actual differences in the files, you can run the git diff command without --name-only.

What is an SPF record and how to add it in cPanel ?

An SPF (Sender Policy Framework) record is a type of DNS (Domain Name System) record that helps prevent email spoofing and phishing by specifying which mail servers are authorized to send email on behalf of your domain. In simpler terms, it’s a way to authenticate and verify that an email sent from your domain is legitimate.

To create and add an SPF record in cPanel, follow these steps:

1. Log into cPanel: Access your cPanel account using your web hosting provider’s interface. Typically, you can access it by going to your domain URL followed by “/cpanel” (e.g., http://yourdomain.com/cpanel) and entering your login credentials.

2. Locate the “Email” Section: Inside your cPanel dashboard, find the “Email” section. Depending on your cPanel version, it may be labeled differently, but it should be something like “Email Authentication,” “Email Authentication/SPF,” or “Authentication.”

3. Access SPF Records: In the “Email” or “Email Authentication” section, you should find an option to manage SPF records. Click on it.

4. Create or Edit SPF Record: You’ll typically have two options: “Enable SPF” or “Edit SPF.” If you already have an SPF record, choose the “Edit SPF” option to make changes. If you’re setting up SPF for the first time, select “Enable SPF.”

5. Define Your SPF Record: In the next step, you’ll need to define your SPF record. You should enter a TXT record that includes the necessary SPF information. Here’s a basic SPF record example:

v=spf1 include:_spf.example.com ~all

In this example, replace “_spf.example.com” with your actual domain or your email service provider’s SPF record if you’re using one.

– `v=spf1` specifies the SPF version.
– `include:_spf.example.com` allows mail to be sent from servers listed in the “_spf.example.com” SPF record.
– `~all` indicates that the SPF policy is to soft fail, meaning that if the email doesn’t match the SPF record, it won’t be rejected but might be marked as suspicious.

6. Save the Record: After entering the SPF record, save your changes. The specific way to save the record may vary depending on your cPanel version.

7. Test the SPF Record: To ensure that the SPF record is correctly set up, you can use online SPF checking tools, such as “MXToolbox” or “SPF Record Testing Tools.” These tools will help you verify if the SPF record is configured properly.

That’s it! Your SPF record is now configured in cPanel, helping to protect your domain from email spoofing and phishing while ensuring that legitimate emails from your domain are properly authenticated.

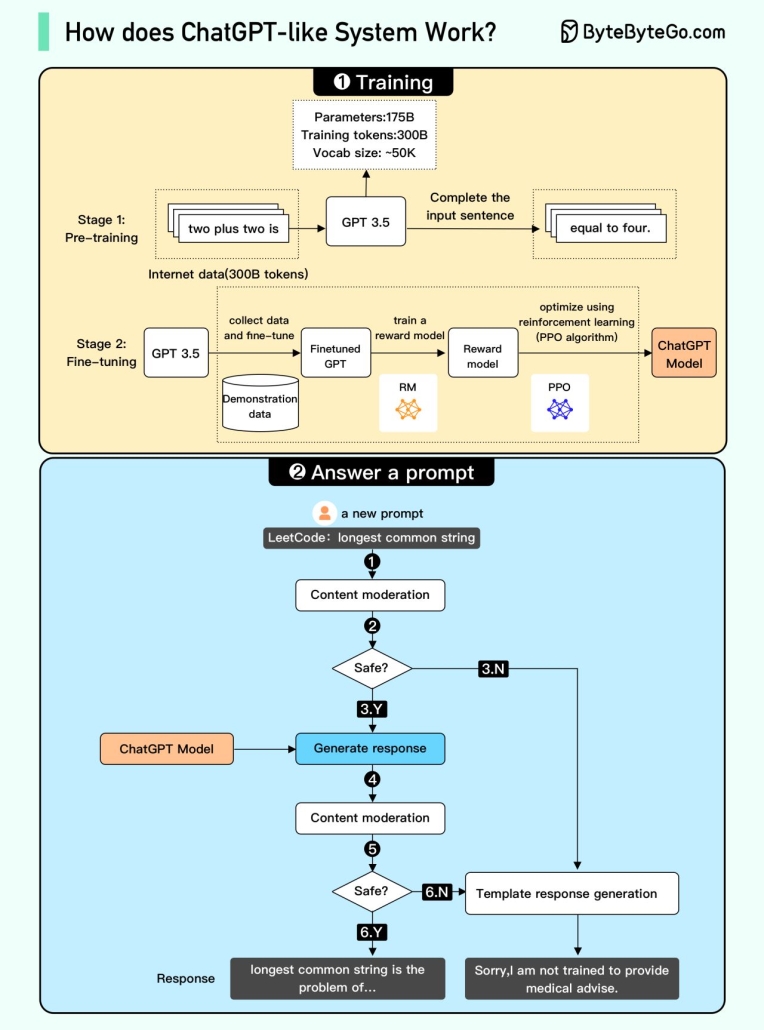
How does ChatGPT work?

Since OpenAI hasn’t provided all the details, some parts of the diagram may be inaccurate.

We attempted to explain how it works in the diagram below. The process can be broken down into two parts (by Ali Aminian and Alex Xu).

1. Training. To train a ChatGPT model, there are two stages:

– Pre-training: In this stage, we train a GPT model (decoder-only transformer) on a large chunk of internet data. The objective is to train a model that can predict future words given a sentence in a way that is grammatically correct and semantically meaningful similar to the internet data. After the pre-training stage, the model can complete given sentences, but it is not capable of responding to questions.

– Fine-tuning: This stage is a 3-step process that turns the pre-trained model into a question-answering ChatGPT model:

1). Collect training data (questions and answers), and fine-tune the pre-trained model on this data. The model takes a question as input and learns to generate an answer similar to the training data.
2). Collect more data (question, several answers) and train a reward model to rank these answers from most relevant to least relevant.
3). Use reinforcement learning (PPO optimization) to fine-tune the model so the model’s answers are more accurate.

2. Answer a prompt

🔹Step 1: The user enters the full question, “Explain how a classification algorithm works”.

🔹Step 2: The question is sent to a content moderation component. This component ensures that the question does not violate safety guidelines and filters inappropriate questions.

🔹Steps 3-4: If the input passes content moderation, it is sent to the chatGPT model. If the input doesn’t pass content moderation, it goes straight to template response generation.

🔹Step 5-6: Once the model generates the response, it is sent to a content moderation component again. This ensures the generated response is safe, harmless, unbiased, etc.

🔹Step 7: If the input passes content moderation, it is shown to the user. If the input doesn’t pass content moderation, it goes to template response generation and shows a template answer to the user.